notes
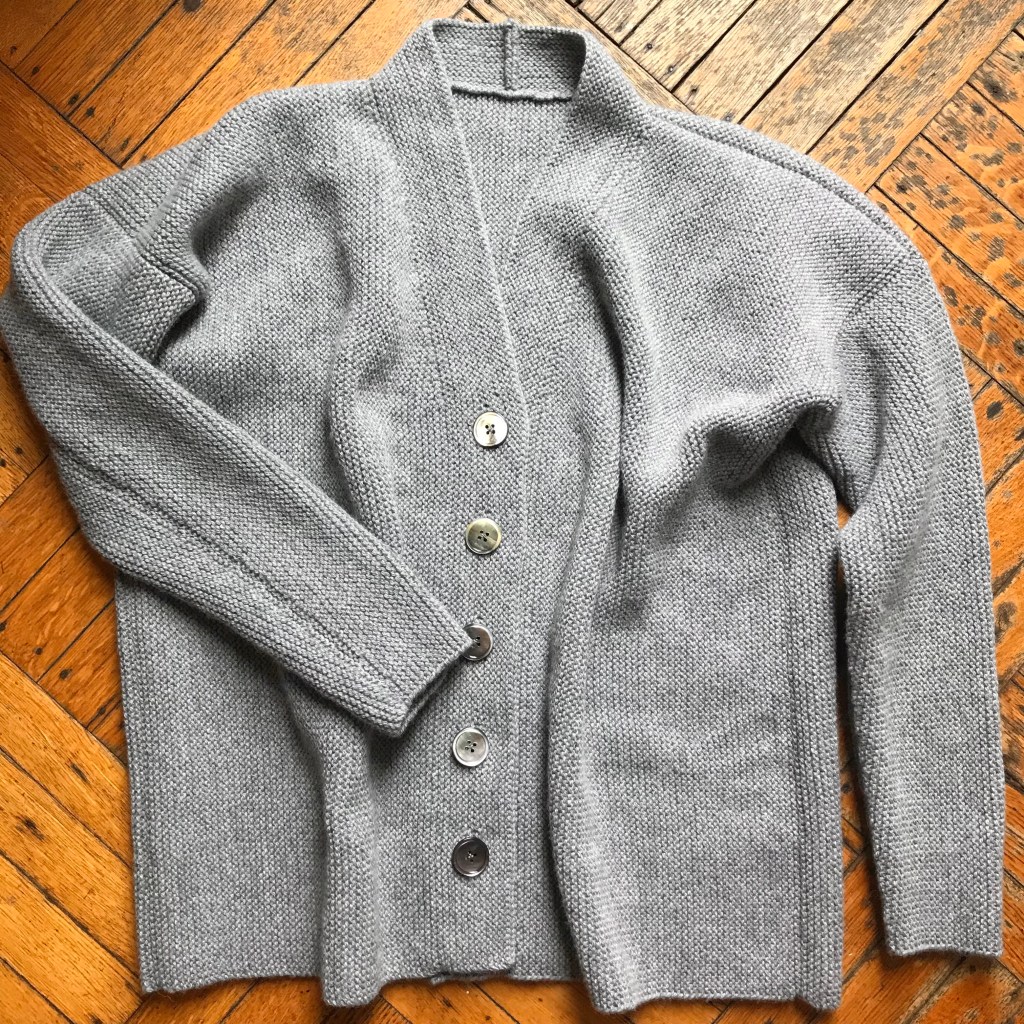
everyday cardigan is a simple garment, knit entirely in garter stitch from side-to-side. the construction is drop-shoulder, which leaves a lot of ease in the torso, while the sleeves fit closer to the skin. it is knit flat in five separate panels, which are then seamed together.
this pattern is completely size-inclusive and can be knit with any yarn and needles! simply enter your gauge and measurements into the accompanying spreadsheet, and the stitch and row counts are calculated precisely for you.
a few recommendations
- use long circular needles, as most of the panels are knit across their widest side.
- prepare to use more yarn than usual for a sweater-sized garment. drop-shoulder construction and garter stitch both use up significantly more yarn than other techniques. (also, consider using a yarn that has some drape, but doesn’t sag; the cardigan is large and heavy.)
- see end of pattern directions on how to modify the fit.
notions: a few detachable stitch markers, scrap yarn, darning needle
schematics
abbreviations
k – knit
st – stitch
w&t – wrap and turn
techniques
short rows in garter stitch
provisional cast on
seaming garter stitch horizontally
seaming garter stitch vertically
seaming garter stitch perpendicularly
picking up stitches in garter stitch
buttonholes in one row
how to read this pattern
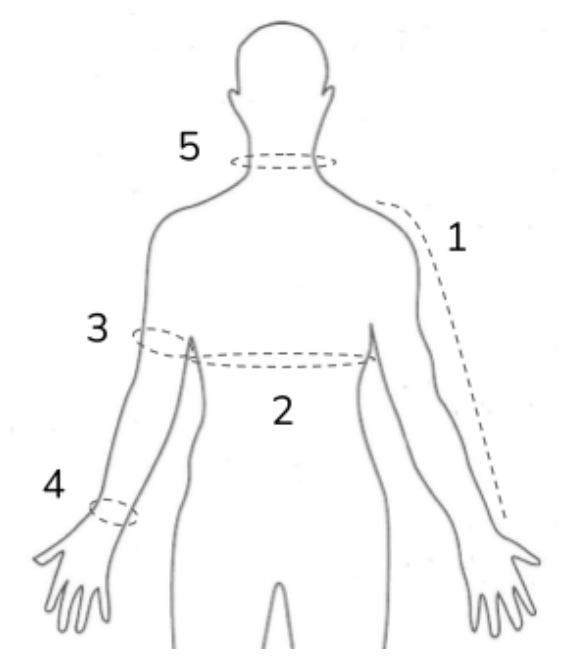
- enter your gauge and measurements (in inches) into the sizing spreadsheet below, in the specified cells.
- you will then see numbers pop up in the variables chart, to the right of their assigned letter variable.
- whenever you encounter a variable in the written pattern, simply plug in the number from the chart.
for example, if variable A was the number 147, then when you plug it into the first line of the written pattern (“Cast on A stitches using the long-tail method (does not count as a row)”, that line will read “Cast on 147 stitches using the long-tail method (does not count as a row)”.
spreadsheet
pattern
back panel
Cast on A stitches using the long-tail method (does not count as a row).
Knit each row until you have B rows.
Bind off loosely.
front panel #1
Cast on A stitches using the long-tail method (does not count as a row).
Knit each row until you have C rows.
Row 1: k to last 3 st, w&t
Row 2: k to end of row
Row 3: k to 3 st before wrap, w&t
Row 4: k to end of row
Repeat Rows 3 and 4 until you have D rows.
Knit one row, without picking up wraps.
Bind off loosely.
front panel #2
NOTE: Be aware that the instructions for front panel #2 are not the exact same as those for #1!
Cast on A stitches using the long-tail method (does not count as a row).
Knit each row until you have E rows.
Row 1: k to last 3 st, w&t
Row 2: k to end of row
Row 3: k to 3 st before wrap, w&t
Row 4: k to end of row
Repeat Rows 3 and 4 until you have F rows.
Knit one row, without picking up wraps, and then knit one more row.
Bind off loosely.
sleeves
Provisionally cast on G stitches, following the beginning of this tutorial (counts as row 1).
Knit each row until you have H rows.
Row 1: k to last J st, w&t
Row 2: k to end of row
Row 3: k to J st before wrap, w&t
Row 4: k to end of row
Repeat Rows 3 and 4 until you have L rows.
Knit one row, without picking up the wraps.
Bind off loosely.
Pick up the stitches from the provisional cast on, following the rest of the tutorial (also counts as row 1).
Repeat the process for the second half of the sleeve, until just before bind-off.
Knit one more row, and bind off loosely.
Repeat the entire process for the second sleeve.
seaming
Before you begin this section, make sure to block each piece of the cardigan according to the measurements
indicated below:
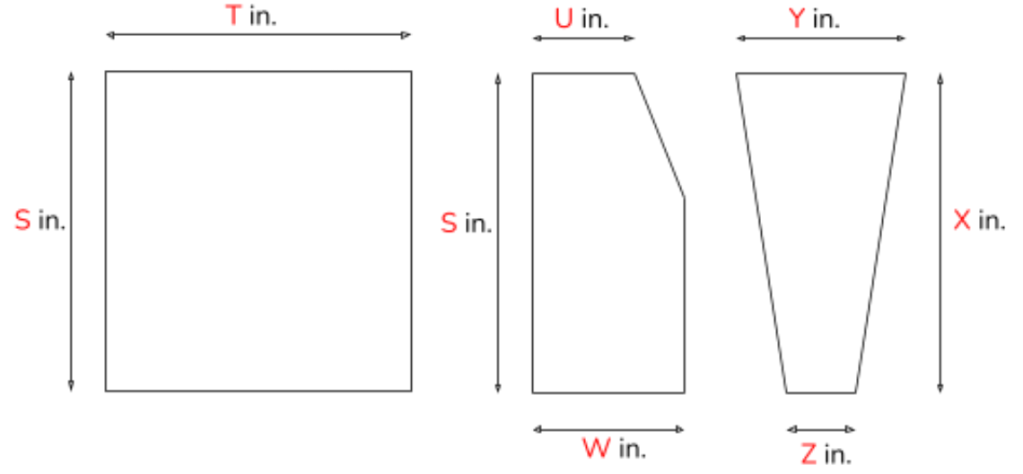
NOTE 1: When you lay out each panel for seaming, make sure that the right side of each piece is facing up. To distinguish the right side from the wrong side of each panel, look at the cast on and bind off edges. On the right side, the Vs of the knit stitches will be visible.
NOTE 2: Remember that all the panels have been knit sideways! The garter ridges should be running from top to bottom, not from side to side as usual.
Seam the tops of each front panel to the back panel, following this tutorial.
Laying the cardigan flat, seam the sleeves to each side, following this tutorial.
Seam up the sides of the body and along the bottom of each sleeve, following this tutorial.
button band side #1
NOTE: If your needles are long enough to comfortably fit the full button band, pick up all stitches from the inside right panel, across the back of the neck, and down the inside of the left panel. Then, just follow the instructions for button band side #1, and ignore the instructions for side #2.
Pick up all stitches from the inside of the right panel, and across approximately half the back of the neck (counts as row 1).
Knit each row until you have M rows.
On this next row, you will be adding buttonholes, following this tutorial. The width of the holes you’ll need to make will vary depending on your buttons, so practice beforehand to determine how many stitches each button hole should be.
Starting from the end you’re about to knit, place Q stitch markers R stitches apart. Knit to the first marker and then make 1 button hole. Repeat for the rest of the markers. After you have reached the final stitch marker and created a buttonhole, knit to the end of the row.
Knit for N more rows (for a total of P rows), and then bind off loosely.
button band side #2
Pick up all stitches starting from the center of the neck, where the first side of the button band ends, across
the rest of the neck, and down the inside of the left panel (counts as row 1).
Knit each row until you have P rows, and then bind off loosely.
Seam the two sides of the button band together.
modifications
This is the fit of the cardigan as designed: 10” positive ease in the chest, 2” positive ease around the upper arms, 1” of positive ease around the wrists; sleeves fall exactly at wrist length, length of the body lines up with the end of the sleeves.
If you want to change some aspects of the fit, here are directions on some common modifications that might help the cardigan fit you better!
Shortening or lengthening the body only:
Increase or decrease the number in cell F3 of the spreadsheet (variable A). Use your stitch gauge to calculate how many stitches you’ll need to change to get your desired length. NOTE: This may automatically change the value in cell F17 (variable R), so that your buttons are placed correctly! However, it will not change the value in cell F18, so make note of the new measurement for blocking.
Shortening or lengthening the sleeves only:
Increase or decrease the number in cell F9 (variable G). Use your stitch gauge to calculate how many stitches you’ll need to change to get your desired length. NOTE: This may automatically change the value in cell F11 (variable J), so that your sleeve shaping works out correctly! However, it will not change the value in cell F22 (variable X), so make note of the new measurement for blocking. If you are also changing the ease at the upper arms, do this modification after you change the ease.
Changing the ease of the body:
Increase or decrease the number in cell C8 (your chest measurement), according to your desired ease. NOTE: Drop-shoulder garments fit best with a lot of positive ease; 6 inches – 12 inches positive ease is often considered the best fit.
Changing the ease at the upper arms only:
Increase or decrease the number in cell C9 (your upper arm measurement), according to your desired ease. NOTE: This may automatically change the value in cells F9 and F11 (variables G and J), so that the sleeve remains in proportion with the body and so that your sleeve shaping works out correctly! If you are also shortening or lengthening the sleeves, do this modification before you change the length.
Changing the ease at the wrist only:
Increase or decrease the number in cell C10 (your wrist measurement), according to your desired ease. NOTE: This may automatically change the value in cell F11 (variable J), so that your sleeve shaping works out correctly!

